How To Lock Entire Workbook In Excel With Password
Here’s an HTML-formatted guide on locking an entire Excel workbook with a password, aiming for a comprehensive explanation in approximately 1000 words, avoiding excessive unnecessary tags:
Protecting sensitive data within an Excel workbook is crucial, especially when sharing or storing files. Excel provides several methods for securing your data, and one of the most robust is password-protecting the entire workbook to prevent unauthorized access, modification, or even viewing of the file’s contents. This comprehensive guide details the steps to lock an Excel workbook with a password and explores the various protection options available.
Understanding Workbook Protection Levels
Excel offers various levels of protection. It’s important to understand the distinction between them to choose the right approach for your security needs:
- Protecting a Worksheet: This locks specific elements within a single worksheet, such as cells, formulas, or objects, while still allowing access to other worksheets in the workbook. It restricts what users can do within a single sheet.
- Protecting Workbook Structure: This prevents users from adding, deleting, hiding, unhiding, or renaming worksheets within the workbook. It safeguards the overall structure of the file but doesn’t necessarily prevent data modification within the sheets themselves.
- Password-Protecting the Entire Workbook (Encryption): This is the highest level of protection. It encrypts the entire workbook with a password, preventing anyone without the correct password from even opening the file and viewing its contents. This is the focus of this guide.
Password-Protecting the Entire Workbook (Encryption): Step-by-Step
Follow these steps to encrypt your Excel workbook with a password:
- Open the Excel Workbook: Begin by opening the Excel workbook you wish to protect.
- Access the “Info” Tab: Click on the “File” tab in the upper-left corner of the Excel window. This will take you to the backstage view.
- Select “Info”: In the backstage view, ensure that “Info” is selected in the left-hand menu. This displays information about the current workbook.
- Choose “Protect Workbook”: Under the “Protect Workbook” section, you’ll find a dropdown menu labeled “Protect Workbook.” Click on this dropdown.
- Select “Encrypt with Password”: From the dropdown menu, choose the option “Encrypt with Password.” This opens the “Encrypt Document” dialog box.
- Enter Your Password: In the “Encrypt Document” dialog box, carefully enter the password you want to use to protect the workbook. Important: Choose a strong password that you can remember, but also store it securely in a password manager or write it down and keep it in a safe place. If you lose or forget the password, you will be unable to open the workbook.
- Confirm Your Password: Excel will prompt you to confirm your password by re-entering it in a new dialog box. This ensures that you haven’t made any typos.
- Save the Workbook: After confirming your password, click “OK.” The “Protect Workbook” section will now indicate that a password is required to open the workbook. You’ll also see a yellow banner at the top of the Excel window confirming that the workbook is encrypted. It is crucial to save the changes you’ve made to the workbook by clicking the “Save” icon or pressing Ctrl+S (or Cmd+S on a Mac). If you don’t save, the password protection will not be applied.
- Close and Reopen to Test: Close the Excel workbook and then reopen it to verify that the password protection is working correctly. You should be prompted to enter the password before you can access the workbook’s contents.
Important Considerations When Choosing a Password
The security of your workbook depends entirely on the strength and memorability of your password. Keep the following points in mind when selecting a password:
- Password Length: Longer passwords are generally more secure. Aim for a password of at least 12 characters.
- Character Variety: Use a mix of uppercase and lowercase letters, numbers, and symbols. This significantly increases the complexity of the password and makes it harder to crack.
- Avoid Personal Information: Do not use easily guessable information such as your name, birthdate, pet’s name, or address.
- Avoid Dictionary Words: Refrain from using common words or phrases found in dictionaries, as these are easily targeted by password-cracking software.
- Use a Password Manager: Consider using a reputable password manager to generate and securely store strong, unique passwords for all your accounts, including your Excel workbooks.
- Remember or Store Securely: If you choose not to use a password manager, make sure you can remember your password or store it in a secure location where unauthorized individuals cannot access it. A physical, offline storage is preferable to an unsecured digital note.
Removing Password Protection
If you no longer need the password protection on your workbook, you can easily remove it:
- Open the Password-Protected Workbook: Open the Excel workbook using the correct password.
- Access the “Info” Tab: Click on the “File” tab and select “Info.”
- Choose “Protect Workbook”: Click on the “Protect Workbook” dropdown menu.
- Select “Encrypt with Password”: Select the “Encrypt with Password” option again.
- Delete the Password: In the “Encrypt Document” dialog box, you’ll see the existing password displayed with asterisks. Delete all the asterisks, leaving the password field completely blank.
- Click “OK”: Click “OK” to confirm the removal of the password.
- Save the Workbook: Save the workbook to apply the changes. The password protection is now removed, and anyone can open the workbook without entering a password.
Troubleshooting Password Issues
If you encounter problems with password protection, consider the following:
- Incorrect Password: Double-check that you are entering the correct password, paying attention to capitalization and special characters.
- Caps Lock: Ensure that the Caps Lock key is not accidentally enabled.
- Keyboard Layout: Verify that your keyboard layout is set correctly, especially if you’re using special characters.
- File Corruption: In rare cases, file corruption can interfere with password protection. Try opening the workbook on a different computer or using Excel’s built-in repair tool (File > Open > Browse, select the file, click the arrow next to “Open,” and choose “Open and Repair”).
- Password Recovery: Unfortunately, Excel does not provide a built-in mechanism for password recovery if you lose or forget the password used for encryption (the “Encrypt with Password” method). This is a security feature designed to protect the data. Third-party password recovery tools exist, but their effectiveness is not guaranteed, and using them carries inherent risks (e.g., malware, data compromise).
Alternatives to Full Encryption
While password-protecting the entire workbook is the most secure option, consider these alternatives if you need a less restrictive approach:
- Protecting Worksheets: Protect individual worksheets to prevent accidental changes or unauthorized modifications to specific data.
- Protecting Workbook Structure: Prevent users from altering the workbook’s structure, such as adding or deleting worksheets.
- Mark as Final: Use the “Mark as Final” option (File > Info > Protect Workbook > Mark as Final) to discourage editing, although it doesn’t prevent it entirely. This is more of a gentle reminder than a security measure.
- Digital Signatures: Use digital signatures to verify the authenticity and integrity of the workbook. This confirms that the file hasn’t been tampered with since it was signed.
Conclusion
Password-protecting an entire Excel workbook is a powerful way to safeguard sensitive data. By following the steps outlined in this guide and choosing a strong, memorable password, you can significantly reduce the risk of unauthorized access to your confidential information. Remember to prioritize password security and consider alternative protection methods based on your specific needs. Always keep a secure backup of your workbook in case of data loss or accidental deletion, although remember that backup must be equally secure to protect the encrypted data within.
 1024×683 protect workbook password excel excel hindi from www.excelsuperstar.org
  678×535 lock excel file password easy techgurupluscom from techguruplus.com
  610×442 password protect excel worksheets workbooks from www.avantixlearning.ca
  1366×731 lock cells excel password protection excel from www.teachoo.com
 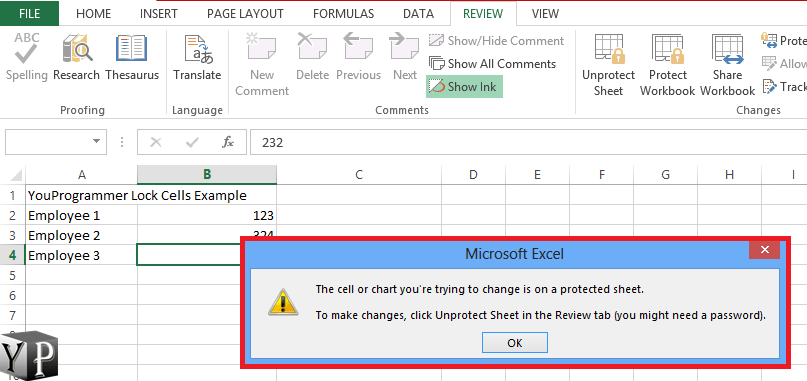 807×381 lock cells excel spreadsheet youprogrammer from youprogrammer.com
  1604×727 unlock spreadsheet pertaining learn lock cells excel from db-excel.com
  939×212 password protect excel worksheets lock unlock cells from www.buyexceltemplates.com
  638×392 ways password protect workbooksheet excel from www.isumsoft.com
  1726×970 password protect excel spreadsheet password from db-excel.com