Weekly Task Planner Template In Excel With Progress Status
Weekly Task Planner Template in Excel with Progress Status
A weekly task planner template in Excel, especially one incorporating progress status tracking, is an invaluable tool for boosting productivity, managing deadlines, and achieving your goals. It offers a structured way to organize your workload, monitor progress, and stay focused on the most important tasks. This article will delve into the benefits of using such a template, provide a step-by-step guide to creating one, and discuss how to effectively utilize it for optimal results.
Why Use a Weekly Task Planner Template in Excel?
In a world filled with distractions and competing priorities, staying organized and on top of your tasks can be a challenge. A well-designed weekly task planner in Excel offers several advantages:
- Centralized Task Management: Consolidates all your tasks into a single, easily accessible location, eliminating the need for scattered notes and multiple to-do lists.
- Improved Organization: Provides a structured framework for categorizing and prioritizing tasks, ensuring you focus on the most important items first.
- Enhanced Time Management: Facilitates effective time allocation by allowing you to estimate the duration of each task and schedule them accordingly.
- Progress Tracking: Enables you to monitor your progress on each task, providing a clear visual representation of your accomplishments and areas that need more attention.
- Increased Accountability: Promotes accountability by visually displaying your commitments and allowing you to track your progress towards achieving them.
- Better Collaboration (If Shared): If the Excel sheet is shared, it allows team members to view the progress of other members, facilitate coordination, and identify potential bottlenecks.
- Customizability: Excel is highly customizable, allowing you to tailor the template to your specific needs and preferences.
- Accessibility: Excel is widely accessible on various devices, ensuring you can access your task planner from anywhere.
Creating a Weekly Task Planner Template in Excel: A Step-by-Step Guide
Here’s a detailed guide to creating your own weekly task planner template in Excel, incorporating progress status tracking:
- Setting Up the Spreadsheet:
- Open a new Excel workbook.
- Rename the first sheet to “Weekly Task Planner.”
- Start by defining the key columns:
- Task: Description of the task to be completed.
- Category: Categorize the task (e.g., work, personal, project A, project B).
- Priority: Indicate the priority level (e.g., High, Medium, Low).
- Start Date: The date the task is scheduled to begin.
- Due Date: The date the task is due to be completed.
- Status: The current status of the task (e.g., Not Started, In Progress, Completed, Blocked).
- % Complete: The percentage of the task that has been completed (0-100%).
- Notes: Any relevant notes or comments regarding the task.
- Enter these column headers into row 1 of your Excel sheet (A1, B1, C1, etc.).
- Adjust column widths to comfortably accommodate the text in each column.
- Format the header row (e.g., bold font, background color) to make it visually distinct.
- Adding Data Validation for Drop-Down Lists:
Data validation helps ensure consistency and accuracy by limiting the options users can enter in specific columns.
- Category Column:
- Select the cells in the “Category” column (e.g., B2:B100).
- Go to the “Data” tab and click on “Data Validation.”
- In the “Settings” tab, choose “List” from the “Allow” dropdown.
- In the “Source” field, enter your desired categories separated by commas (e.g., Work,Personal,Project A,Project B).
- Click “OK.” Now, users can only select categories from the dropdown list.
- Priority Column:
- Repeat the process for the “Priority” column (e.g., C2:C100).
- Enter your desired priority levels in the “Source” field (e.g., High,Medium,Low).
- Click “OK.”
- Status Column:
- Repeat the process for the “Status” column (e.g., F2:F100).
- Enter your desired status options in the “Source” field (e.g., Not Started,In Progress,Completed,Blocked).
- Click “OK.”
- Category Column:
- Conditional Formatting for Visual Progress Tracking:
Conditional formatting allows you to automatically change the appearance of cells based on their values. This is particularly useful for visually tracking progress.
- Highlighting Based on Status:
- Select the entire data range (e.g., A2:H100).
- Go to the “Home” tab and click on “Conditional Formatting.”
- Choose “New Rule.”
- Select “Use a formula to determine which cells to format.”
- Enter the following formula to highlight “Completed” tasks (assuming “Status” is in column F):
=$F2="Completed" - Click on “Format” and choose a background color (e.g., green) to indicate completion.
- Click “OK” twice.
- Repeat this process for other status options (e.g., “In Progress” – yellow, “Blocked” – red).
- Data Bars for % Complete:
- Select the cells in the “% Complete” column (e.g., G2:G100).
- Go to the “Home” tab and click on “Conditional Formatting.”
- Choose “Data Bars” and select a data bar style (e.g., gradient fill).
- This will visually represent the percentage completion of each task.
- Highlighting Based on Status:
- Formulas for Automatic Calculations (Optional):
You can add formulas to automate calculations and provide additional insights.
- Calculating Days Remaining:
- Add a new column named “Days Remaining” in I1.
- In cell I2, enter the formula:
=IF(F2="Completed",0,IF(TODAY()>D2,0,D2-TODAY())) - This formula calculates the number of days remaining until the due date, only if the task is not complete and the due date has not passed. If the due date has passed or the task is complete, it shows ‘0’.
- Drag the formula down to apply it to all rows.
- Calculating Task Age:
- Add a new column named “Task Age” in J1.
- In cell J2, enter the formula:
=IF(F2="Completed",TODAY()-C2,TODAY()-C2) - This formula calculates the number of days between start date and the current date
- Drag the formula down to apply it to all rows.
- Calculating Days Remaining:
- Filtering and Sorting Data:
Excel’s filtering and sorting capabilities allow you to quickly analyze and organize your tasks.
- Select the entire data range (including headers).
- Go to the “Data” tab and click on “Filter.”
- This will add dropdown arrows to each column header.
- Click on a dropdown arrow to filter tasks based on criteria such as category, priority, status, or due date.
- You can also sort tasks based on any column (e.g., sort by due date to prioritize tasks with approaching deadlines).
- Adding a Summary Section (Optional):
Create a summary section at the top of the sheet to provide an overview of your weekly progress.
- Above the table, add cells for:
- Total Tasks:
=COUNTA(A:A)-1(This counts the number of non-empty cells in column A, subtracting 1 for the header). - Tasks Completed:
=COUNTIF(F:F,"Completed")(This counts the number of cells in column F that contain “Completed”). - Tasks In Progress:
=COUNTIF(F:F,"In Progress") - Tasks Not Started:
=COUNTIF(F:F,"Not Started") - Tasks Blocked:
=COUNTIF(F:F,"Blocked") - % of Tasks Completed:
=(COUNTIF(F:F,"Completed")/(COUNTA(A:A)-1))*100(Formatted as a percentage). - Format these cells to make them visually appealing.
Effectively Using Your Weekly Task Planner
Creating the template is only the first step. Here’s how to effectively use it to maximize your productivity:
- Regular Updates: Update your task planner daily or at least a few times a week. Keeping it up-to-date ensures it remains a valuable tool.
- Realistic Time Estimates: Be realistic when estimating the time required for each task. Overestimating is better than underestimating.
- Prioritization: Regularly review and adjust task priorities based on changing circumstances.
- Focus on One Task at a Time: Avoid multitasking. Focus on completing one task before moving on to the next.
- Break Down Large Tasks: Divide large, complex tasks into smaller, more manageable subtasks.
- Review and Reflect: At the end of each week, review your progress and identify areas for improvement. What worked well? What could be done differently next week?
- Use Notes Effectively: The Notes column is crucial. Add reminders, links to relevant documents, or any other information that will help you complete the task.
- Automate with Excel Features: Explore other Excel features like reminders and email notifications to further automate your task management process.
- Customize as Needed: Don’t be afraid to modify the template to better suit your evolving needs. Add or remove columns, change formatting, or adjust formulas as required.
Conclusion
A weekly task planner template in Excel with progress status is a powerful tool for enhancing productivity, improving time management, and achieving your goals. By following the steps outlined in this guide and consistently using your template, you can gain control over your workload, track your progress, and stay focused on what matters most. Remember to customize the template to fit your specific needs and regularly update it to ensure it remains a valuable asset in your journey towards greater efficiency and success.
 0 x 0 weekly planner excel template daily task schedule list from www.etsy.com
  2000×2000 weekly planner excel template daily task schedule list excel from www.etsy.com
  0 x 0 weekly planner excel template daily task schedule etsy from www.etsy.com
  1542×1188 excel study task progress templatexlsx wps templates from template.wps.com
  1588×1588 basic weekly planner excel template excel template weekly planning from www.etsy.com
  1650×1275 weekly task tracker excel template from data1.skinnyms.com
 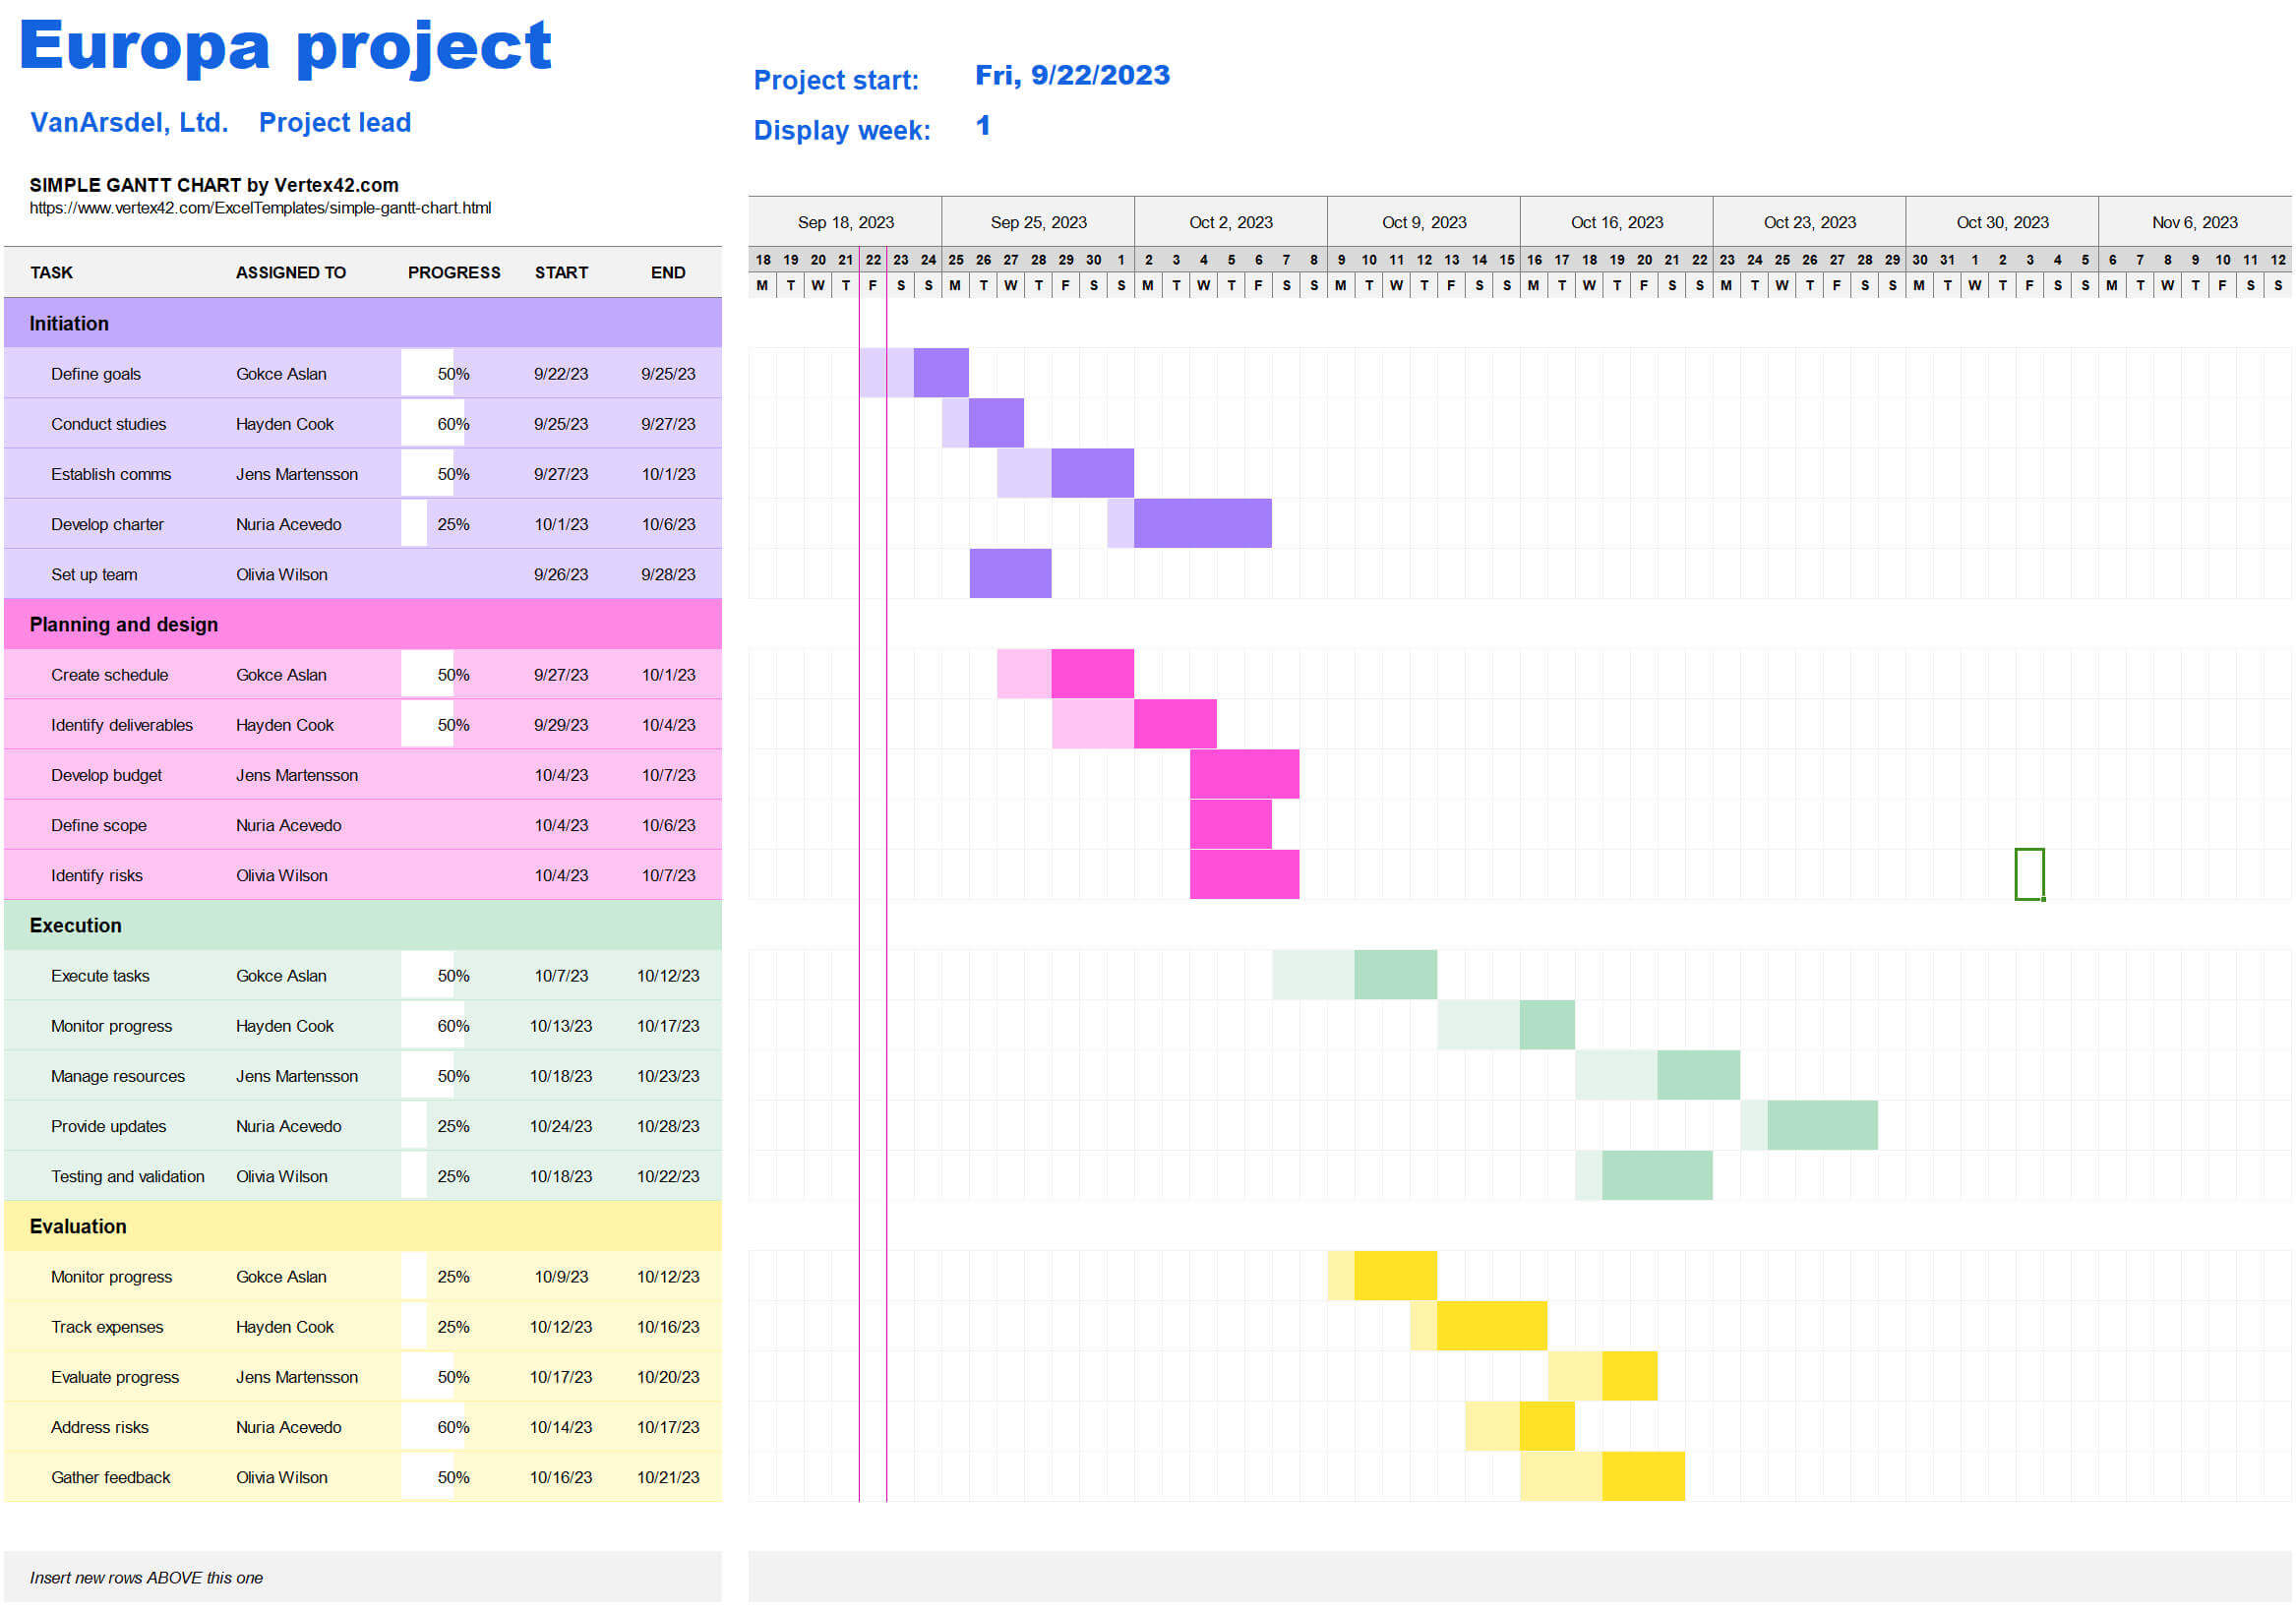 2334×1639 task tracker excel templates updf from updf.com
  656×492 weekly task tracker excel template vrogueco from www.vrogue.co
  580×400 weekly task list template excel from www.free-power-point-templates.com
  1082×771 weekly task list template excel from templates.rjuuc.edu.np
  860×839 efficient weekly planner excel template organize tasks from tidysheet.com
  0 x 0 excel task tracker template excel planner spreadsheet monthly from www.etsy.com
  766×760 weekly task report template excel from www.animalia-life.club
  0 x 0 excel task tracker planner list corporate personal task from www.etsy.com