How To Split Excel Sheet Into Multiple Workbooks
Splitting an Excel Sheet into Multiple Workbooks
Sometimes, working with a massive Excel sheet containing data for multiple departments, projects, or clients can become unwieldy. Managing such a large file can be slow, difficult to navigate, and cumbersome for sharing specific subsets of data. The solution? Splitting the original sheet into multiple, smaller workbooks, each containing only the relevant data. This document provides a comprehensive guide on how to achieve this, covering various methods and considerations to ensure a smooth and efficient process.
Why Split an Excel Sheet?
Before diving into the “how,” let’s solidify the “why.” Splitting an Excel sheet into multiple workbooks offers several advantages:
- Improved Performance: Smaller files load and process faster, enhancing overall performance and reducing lag.
- Enhanced Organization: Data is logically grouped, making it easier to find and manage specific information.
- Simplified Sharing: Sharing smaller, targeted workbooks is more efficient and reduces the risk of exposing sensitive data to unintended recipients.
- Reduced File Corruption Risk: Smaller files are generally less susceptible to corruption.
- Easier Collaboration: Multiple users can work simultaneously on different workbooks without affecting each other.
- Backup and Recovery: Smaller files are easier to back up and recover.
Methods for Splitting an Excel Sheet
Several methods can be employed to split an Excel sheet into multiple workbooks, each with its own strengths and weaknesses. The best method depends on the structure of your data and your specific requirements. We’ll explore the most common approaches:
1. Manual Copy and Paste
This is the simplest, but also the most time-consuming and error-prone, method. It’s suitable for small datasets or when only a few splits are needed.
- Identify the Split Criteria: Determine how you want to divide the data (e.g., by department, region, date range).
- Create New Workbooks: Open new Excel workbooks, one for each split.
- Copy and Paste Data: In the original sheet, select the data corresponding to the first split criterion, copy it (Ctrl+C), and paste it (Ctrl+V) into the first new workbook. Repeat this process for each split, ensuring accurate data transfer.
- Save the New Workbooks: Save each new workbook with a descriptive name (e.g., “Sales_Department_A.xlsx”).
Pros:
- Simple to understand and implement.
- No specialized knowledge required.
Cons:
- Tedious and time-consuming, especially for large datasets.
- Prone to errors during copy-pasting.
- Difficult to maintain consistency between workbooks.
2. Using Excel’s Built-in Filtering and Copy/Paste
This method is slightly more efficient than the manual approach, as it leverages Excel’s filtering capabilities to isolate the data for each split.
- Identify the Split Column: Choose the column containing the criteria for splitting (e.g., “Department,” “Region”).
- Apply a Filter: In the original sheet, select the header row and click the “Filter” button on the “Data” tab.
- Filter for the First Split: Click the filter dropdown arrow for the split column and select the first criterion (e.g., “Department A”). This will display only the rows corresponding to that criterion.
- Copy and Paste Filtered Data: Select the visible data (excluding the header row), copy it, and paste it into a new workbook.
- Repeat for Each Split: Repeat steps 3 and 4 for each split criterion, creating a new workbook for each. Remember to change the filter each time.
- Save the New Workbooks: Save each new workbook with a descriptive name.
Pros:
- Reduces the risk of errors compared to manual copy-pasting.
- More efficient than the manual approach for moderately sized datasets.
Cons:
- Still requires manual intervention for each split.
- Time-consuming for large datasets with many splits.
- Requires careful attention to ensure accurate filtering.
3. Using VBA (Visual Basic for Applications)
VBA offers the most powerful and automated way to split an Excel sheet into multiple workbooks. It requires some programming knowledge, but the benefits in terms of efficiency and accuracy are significant. Here’s a sample VBA code snippet:
Sub SplitExcel() Dim ws As Worksheet Dim lastRow As Long Dim i As Long Dim splitColumn As Integer 'Column number to split by (e.g., 1 for Column A) Dim splitValue As String Dim newWb As Workbook Dim newWs As Worksheet Dim filePath As String Dim dict As Object 'Dictionary to store unique values from the split column 'Set the column number to split by splitColumn = 1 'Get the active worksheet Set ws = ActiveSheet 'Get the last row with data lastRow = ws.Cells(Rows.Count, splitColumn).End(xlUp).Row 'Create a dictionary to store unique values Set dict = CreateObject("Scripting.Dictionary") 'Loop through the split column and add unique values to the dictionary For i = 2 To lastRow ' Start from row 2 to skip header splitValue = ws.Cells(i, splitColumn).Value If Not dict.Exists(splitValue) Then dict.Add splitValue, 1 End If Next i 'Loop through the unique values in the dictionary and create a new workbook for each Dim key As Variant For Each key In dict.Keys splitValue = key 'Create a new workbook Set newWb = Workbooks.Add Set newWs = newWb.Sheets(1) ws.Rows(1).Copy newWs.Rows(1) 'Copy header row 'Copy the matching rows to the new workbook Dim rowCounter As Long rowCounter = 2 'Start from row 2 in the new workbook For i = 2 To lastRow If ws.Cells(i, splitColumn).Value = splitValue Then ws.Rows(i).Copy newWs.Rows(rowCounter) rowCounter = rowCounter + 1 End If Next i 'Save the new workbook filePath = ThisWorkbook.Path & "" & splitValue & ".xlsx" 'Save in the same directory as the original workbook newWb.SaveAs filePath newWb.Close SaveChanges:=False 'Close the workbook without saving again Next key MsgBox "Excel sheet split successfully!", vbInformation End Sub **How to use the VBA code:** 1. **Open the VBA Editor:** In Excel, press `Alt + F11`. 2. **Insert a Module:** In the VBA editor, go to `Insert > Module`. 3. **Paste the Code:** Copy the VBA code provided above and paste it into the module. 4. **Modify the Code (Important):** * Change `splitColumn = 1` to the actual column number you want to split by (e.g., 2 for column B, 3 for column C, etc.). Remember to adjust the start row in the loops if your header isn’t on row 1. * Adjust the `filePath` variable if you want to save the new workbooks in a different directory. 5. **Run the Code:** Go back to your Excel sheet and run the macro by pressing `Alt + F8`, selecting `SplitExcel`, and clicking “Run.” **Explanation of the VBA Code:** * **`SplitExcel` Subroutine:** This is the main procedure that contains the code to split the Excel sheet. * **Variable Declarations:** The code declares several variables to store worksheet objects, row numbers, and the split column number. * **`splitColumn`:** This variable defines the column number used for splitting the data. **Important: Change this to match your data.** * **`lastRow`:** This finds the last row containing data in the `splitColumn`. * **Dictionary Object:** A dictionary is used to store the unique values from the split column, which prevents duplicate workbooks. * **Looping and Filtering:** The code loops through each unique value in the split column. For each unique value, it creates a new workbook, copies the header row, and then copies all rows from the original sheet that match the current unique value into the new workbook. * **Saving and Closing:** After copying the data, the new workbook is saved with a filename based on the unique value and closed. * **Error Handling:** A more robust implementation would include error handling (e.g., checking if the file already exists) to prevent unexpected issues. Pros:
- Highly automated and efficient.
- Accurate and consistent.
- Customizable to specific requirements.
Cons:
- Requires VBA programming knowledge.
- Can be complex to implement and debug.
- May require adjustments based on the specific data structure.
4. Using Power Query (Get & Transform Data)
Power Query, available in newer versions of Excel (2010 and later), offers a powerful and flexible way to split data without writing VBA code. While not a direct “split sheet” function, Power Query can be used to filter data and create separate tables that can then be loaded into separate workbooks. The process involves creating a query for each split, filtering the data based on the desired criteria, and then loading each query into a separate workbook. This method is more interactive and often more manageable than writing complex VBA code, especially for users familiar with data transformation tools. Detailed instructions for Power Query splitting is beyond the scope of this document, but many excellent tutorials exist online. Search for “Excel Power Query split data into multiple files” to find detailed guides. Pros:
- No VBA programming required.
- More interactive and visual than VBA.
- Powerful data transformation capabilities.
Cons:
- Requires familiarity with Power Query.
- Can be less automated than VBA for complex scenarios.
- Might require more manual steps to create and manage multiple queries.
Considerations Before Splitting
Before splitting your Excel sheet, consider the following: * **Data Integrity:** Ensure that the splitting process doesn’t compromise the integrity of your data. Double-check the results to verify that all data has been transferred correctly. * **Data Relationships:** If your data involves relationships between different tables, carefully plan how to maintain those relationships after splitting. You might need to use external references or database connections. * **Automation Needs:** If you need to split the sheet regularly, investing time in creating a VBA macro will be worthwhile. For one-time splits, manual or filtering methods may suffice. * **File Naming Convention:** Establish a clear and consistent naming convention for the new workbooks to ensure easy identification and organization. * **Header Rows:** Decide whether to include header rows in each new workbook. If you do, ensure consistency across all files. * **Formulas and Calculations:** Be aware of formulas and calculations in your sheet. Ensure that they continue to function correctly in the new workbooks, especially if they rely on data outside of the individual split. * **File Format:** Save the new workbooks in the appropriate file format (.xlsx, .xlsm, .xlsb) based on your needs.
Conclusion
Splitting an Excel sheet into multiple workbooks can significantly improve data management, performance, and collaboration. Choose the method that best suits your technical skills, data complexity, and automation requirements. By carefully planning and executing the splitting process, you can create a more organized and efficient workflow. Remember to prioritize data integrity, establish clear naming conventions, and address any potential issues related to formulas, data relationships, and formatting. Whether you opt for manual copy-pasting, filtering, VBA automation, or Power Query, the key is to tailor the solution to your specific needs and ensure a smooth transition to a more manageable data structure.
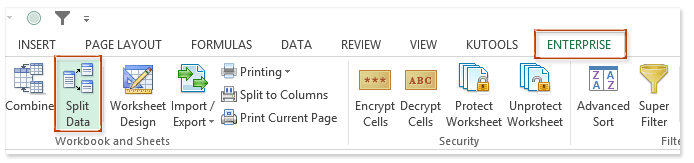 694×163 split range data multiple workbooks excel from www.extendoffice.com
  1280×720 split worksheet multiple workbooks printable from timestablesworksheets.com
  2878×1414 split excel sheet multiple worksheets sheetgo blog from blog.sheetgo.com
 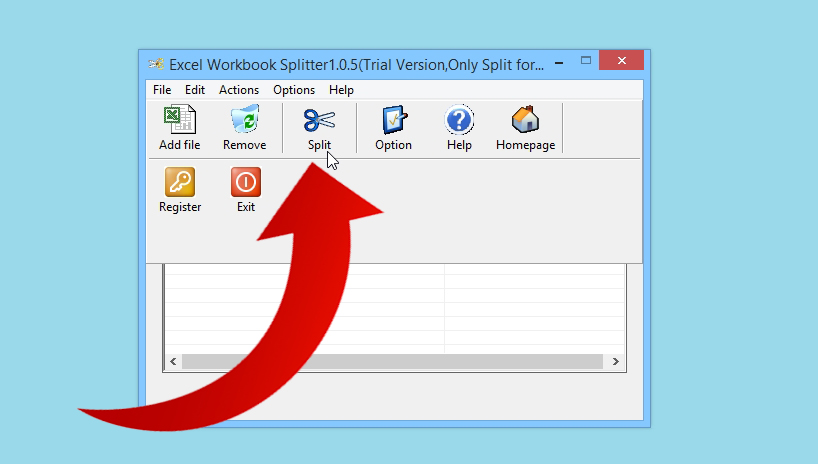 818×464 split multi sheet workbook excel single excel file from www.wikihow.com
  300×201 split excel sheet multiple workbooks vba from yodalearning.com